Shadywood Quilts
Professional Machine Quilting
Side Triangle and Corner Triangle Cutting Chart
Quilters can use this triangle cutting chart when piecing a diagonal layout quilt.
In a "diagonal" layout, blocks are placed 'on-point'.
Glossary Terms for Triangle Cutting Chart
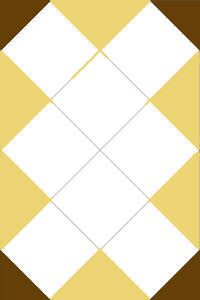 on-point - (see white blocks)
- diagonal layout, diagonal setting
- corner triangle - (in brown)
- side triangle - (in yellow)
- finished size - size of block, NOT including seam allowance
First we have to understand what side and corner triangles are. The corner triangles, shown in dark brown, are in the 'corners'. 'Side triangles', shown in yellow, are along the edges.
Cutting Triangles from Squares
This triangle cutting chart is based on cutting squares then sub-cutting the squares into triangles.
Cut the square twice diagonally for side triangles.

Cut the square once diagonally for corner triangles

Why Would You Cut Triangles from Squares?
Squares are easy to cut. First, cut along the width of fabric. Next, sub-cut into squares. Finally, sub-cut the squares into 2 or 4 triangles. Cutting squares this way ensures the grain lines follow the outer edges of the quilt.
The picture below shows the grain lines for the side triangle cuts. These cuts put either the crosswise or lengthwise grain along the outside edges of the quilt.


For more information on grain lines, check out the Recommendations at the end of this article.
By putting the crosswise or lenghtwise grain on the outside, it helps elimanate the 'stretch' that on the bias creates.
NOTE: Another way to cut side and corner triangles is to cut strips and use a specialty ruler.
How to Use the Triangle Cutting Chart
Step 1 – First, find the finished block size in column 1.
Step 2 – Find the corresponding number in column 2. Cut squares to this size in inches. One square gives you 4 side triangles.
Step 3 – Find the corresponding number in column 3. Cut 2 squares to this size in inches. One square gives you 2 corner triangles.
NOTE: When in doubt about what size to cut, always round UP just to be sure. You can always trim it down later.
Size |

|

|
| 3.0 | 5-1/2 | 3 |
| 3.5 | 6-1/4 | 3-5/8 |
| 4.0 | 7 | 3-3/4 |
| 4.5 | 7-5/8 | 4-1/8 |
| 5.0 | 8-3/8 | 4-1/2 |
| 5.5 | 9-1/8 | 4-7/8 |
| 6.0 | 9-3/4 | 5-1/8 |
| 6.5 | 10-1/2 | 5-1/2 |
| 7.0 | 11-1/4 | 5-5/8 |
| 7/5 | 12 | 6-1/4 |
| 8.0 | 12-5/8 | 6-5/8 |
| 8.5 | 13-3/8 | 6-7/8 |
| 9.0 | 14 | 7-1/4 |
| 9.5 | 14-3/4 | 7-5/8 |
| 10.0 | 15-1/2 | 8 |
| 10.5 | 16-1/8 | 8-3/8 |
| 11.0 | 16-7/8 | 8-3/4 |
| 11.5 | 17-1/2 | 9-1/8 |
| 12.0 | 18-1/4 | 9-3/8 |
| 12.5 | 19 | 9-3/4 |
| 13.0 | 19-3/4 | 10-1/8 |
| 13.5 | 20-3/8 | 10-1/2 |
| 14.0 | 21-1/8 | 10-7/8 |
| 14.5 | 21-3/4 | 11-1/8 |
| 15.0 | 22-1/2 | 11-1/2 |
| 15.5 | 23-1/4 | 12 |
| 16.0 | 24 | 12-1/4 |
| 16.5 | 24-5/8 | 12-5/8 |
| 17.0 | 25-3/8 | 13 |
| 17.5 | 26-1/8 | 13-1/4 |
| 18.0 | 26-3/4 | 13-5/8 |
Triangle Math
If you prefer to do the math yourself, here are the formulas:
Side Triangles
(Finished block size in inches x 1.414) + 1.25″
Corner Triangles
(Finished block size in inches / 1.414) + .875″