Shadywood Quilts
Professional Machine Quilting
Easy Disappearing Nine Patch Tutorial
Easy Disappearing 9-Patch Quilt Pattern
Disappearing Nine Patch quilts are designed by arranging and sewing together nine squares to create a traditional nine patch quilt block. But, instead of leaving the block as-is it is sliced (or chopped) into four equal sections to create the disappearing design.
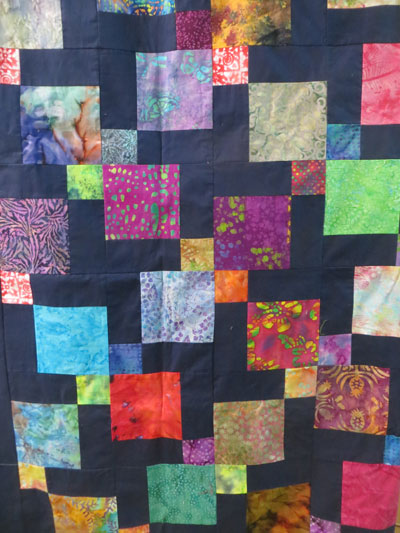
I originally used this block with a block exchange with my quilt bee several years ago. We ALL used a French Navy Blue for the 'sashing' blocks, and used brightly colored batiks for the 'color block' and 'cornerstones'.
Disappearing Nine Patch Terms
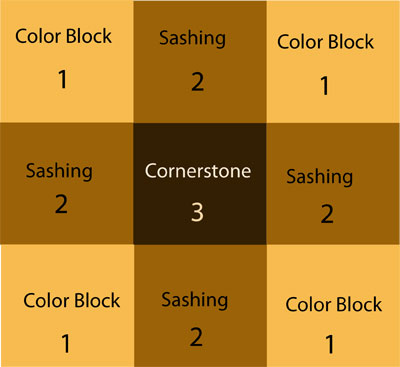
- DNP (or D9P) - Disappearing Nine Patch
- Nine-Patch - This is the original block that is made. Made up of 9 squares, they can be random, or made up with a color pallet. The block size of these nine-patches can be pretty much any size.
- Color Block- This is the block in the four corners. They are not cut, and will feature prominently in our finished quilt block.
- Sashing - This part of the 9-patch gets cut in half, and becomes the 'sashing' in the final quilt.
- Cornerstone - the center block gets cut twice. This becomes the cornestone blocks of the quilt.
Cutting The Nine Patch
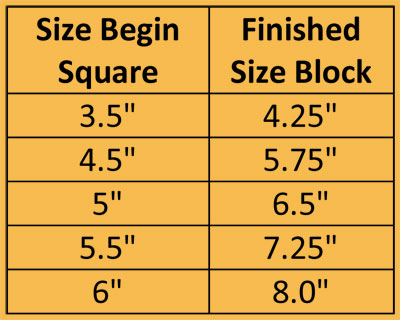
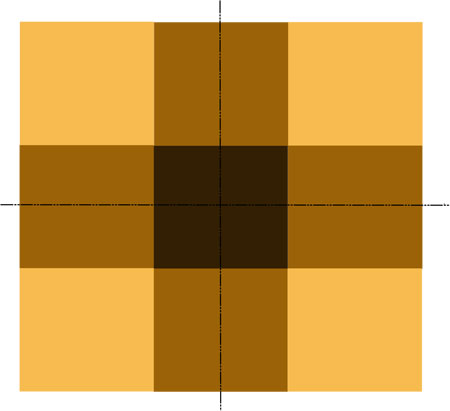 Whatever the size of the blocks, you are dividing the block into quarters. (see chart below).
So, if the 'finished' size (size of block WITHOUT the seam allowance), divide that in half. Make a vertical cut, and a horizontal cut.
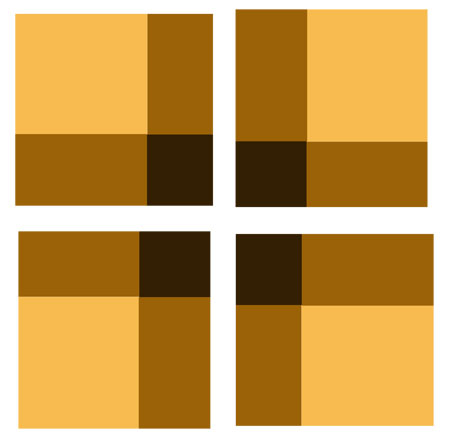 You now have 4 smaller blocks. Again, reference the chart below for the size blocks.
You can always 'size' them a bit smaller if you find that you might have taken a larger (or smaller) seam allowance than the typical 1/4". The rule is simple - just make them ALL the same size. No worries, no quilt police!
 Color Options For Designing Your DNP
- The Scrapbuster - totally scrappy - use a different fabric in square
- Value System - Light/Medium/Dark fabric in the same position of each nine-patch
- Use the same or similar themed (i.e. florals) in the 4 outer corners, maybe (with the floral example), green sashings, and a red or brown cornerstone!
- Use the 'same' fabric for either the sashing or cornerstones (or both) to give the eye a place to rest.
The photo to right is quilt I made for a nephew, that has the SAME TEXAS fabric in the color block section. Used a navy for the sashing, Red for the cornerstones.
Making the Nine-Patch Block
There are several popular ways of making the nine patch block.
 One at a time - Cut desired size beginning block*. All squares of the nine patch will be cut the same size. If cutting from scraps and odds and ends, this is a great way to use up those lovely fabrics. It is then assembled one piece at a time to create three rows, which are then sewn together and pressed.
If you have yardage or fat quarters of a fabric, rather than cut out individual squares, use your rotary cutter to cut strips to size, and sew those strips together. Then sub-cut to your desired block size.
Another option is to use strip piecing techniques to create long strip sets of three fabrics each to mimic rows. (see the Texas DNP above). Strip sets are cut into segments that are the same length as the squares used to construct the set.
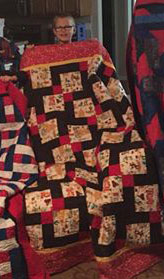
Swapping Blocks - My favorite. Swap big nine patches with your quilting buddies. The colorful quilt to the left was made from Batiks in the 4 color block squares and the center/cornerstone block. This scrappy quilt was made from nine-patch blocks that were swapped in my Bee. We all used the same navy fabric for the sashing. Each of the four corners were a different batik, so when we took them home and did the cut, we had four different blocks.
Note the secondary design that is made by using the same dark navy solid fabric.
What Size Squares Do I Cut?
* Squares of any consistent size can be used to assemble the nine-patch nine patch blocks for a Disappearing Nine Patch (DNP) quilt. Each of the four blocks should be the same 'finised' size. Especially if you are using blocks pieced someone else, be sure to 'size' your blocks and trim them to the size YOU want.
Strip Piecing a Disappearing 9-Patch Quilt
Strip Piece Blocks
If you're a new quilter, we do suggest that you understand the basics of rotary cutting. That is not what this tutorial is about. BUT, as soon as you are comfortable with using your rotary cutter, ruler and mat, you will love this as a beginning project.
Determine which size beginning square you are going to use. Most commonly used are probably 6 or 5 inch squares. (CHARM PACKS are awesome, as they are pre-cut to 5" and will give you a 6.5" block)
Decide what layout you are going to use. Where will darks, lights, mediums, brights, themed fabric, etc. be positioned in your block?
Cut Width of Fabric (WOF) long fabric strips in widths that match the nine-patch's square size, and remember that segments will be cut that same size. (If using the 5" squares, then you will subcut 5").
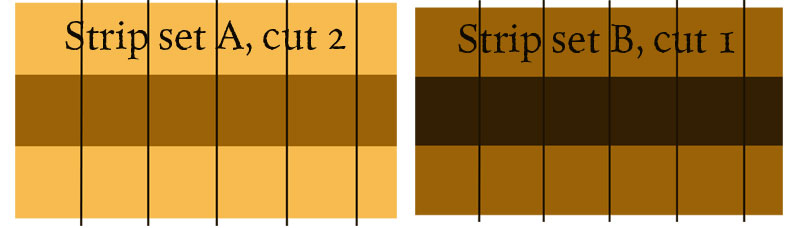
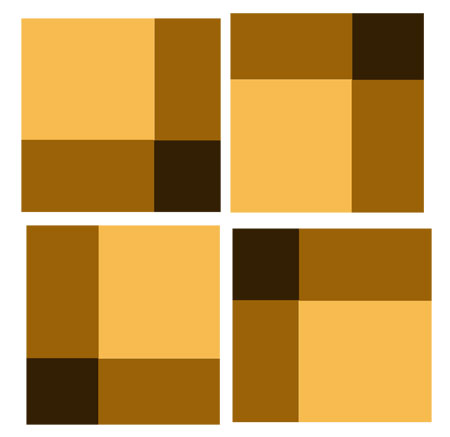
Repeat to create strip sets and segments for each row. You would also make a strip set with the cornerstone fabric in the center and the two sashing fabrics on the top and bottom.
You need (two) of Set A and (one) set for set B.
Adjust the strip length to suit your needs. For instance, in the example with the charm squares, 5" wide strips cut across the fabric's crosswise grain, from selvage to selvage, would be long enough to cut (8) identical segments from the finished strip set—enough for 8 nine-patch block rows.
Pressing the Strip Sets
We highly recommend that you press your seams so that when assembling blocks, the seams always 'nest'. That means that the bulk of seam allowance are going opposite directions. The swirled seams referenced in the link below (as well as nesting seams) will help you piece a more accurate quilt top.
 Here is a link (offsite) with a great tutorial about pressing the seams and making Swirled Seams for your Nine Patch block.
Layout
Use your design wall (floor space or kitchen table) to lay out the blocks. There are other layouts, but this is the most popular. Just remember to put two cornerstones together and two color blocks together.
Lay the blocks out in a way that is pleasing to YOU!. Try to separate duplicate fabrics from being next to each other.
Look through your camera from a distance, and anything that looks out of place, you should move to another area.
Our Mulberry Quilt Chapter have been provided with KITs of 5" squares to create throw sized quilts for charity. They consist of 48 'focus' fabrics, 48 'sashing' fabrics and 12 'cornerstone' fabrics.
These kits use this same process to complete these tops.
Back to Block Swap Quilts