Shadywood Quilts
Professional Machine Quilting
Traditional Straight Edge Quilt Binding
Binding is the final step that gives your project a professional finish. There are several types and styles of binding. What is the quilt going to used for? If it is a Nursing home or other facility that is going to harsh and unknown laundering, you probably want to go with total machine quilting. Our Nursing Homes in the Houston area requested that we NOT use hand binding as the quilts do not stand up to industrial laundry.
Heirloom Baby Quilt
OK, who are you are making a quilt for; grandkid or neice/nephew. Is this quilt on 'heirloom' quilt or 'let's get on the floor and play' quilt. The answers to these questions will help determine if you will want to do hand or machine binding.
 Over the years, we have found that if the quilt is going to get heavy use (like a kid in college) you are going to want to go with a machine binding. Of course if you want to do hand binding, no one is stopping you. My biggest hint for that is to use SHORT (no more than 18") thread cuts so that if the binding comes undone, there is a smaller area to repair.
Start With the Front or the Back?
If HAND binding, apply the binding to the TOP side of the quilt, and hand stitch the binding to the back side.
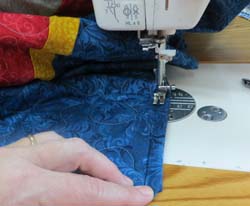
For MACHINE binding, apply the binding to the backside and flip to the front for even binding. Be sure to use coordinating thread so that the stitching blends in.
Photo at right shows final step of machine binding on the front side of quilt.

We use binding on many projects here at Shadywood Quilts, and we always get lots of compliments about how nice it looks.
We also get a lot of questions about how we create our bindings. Actually, the infographic is our bindings in a nutshell. However, we have some additional suggestions on how to cut the binding fabrics, pressing, joining the ends and applying the binding to your project. Let me be the first to say that there is no 'one way' to do binding. I've been quilting since the late 1970's and have tried many different methods. What I'm going to talk about is what works for me.
First, a little bit of history. When I first started quilting, while I machine pieced the quilt tops, I hand-quilted everything, including adding the binding by hand.
Fast forward to 2001, and I am working with several charity groups that make donation quilts for such great causes as Linus Project, Nursing Home (or Comfort) quilts, Quilts of Valor and so on. What we found is that applying the binding totally by machine produces better long-term results than hand finishing. Folks laundering quilts, takes a toll on the binding, and binding by machine seems to last a lot longer.
Note (July 2019) - Mom's hand binding on the ONE quilt she did has pretty much come unsewn after just a few times in the laundry :(
Straight Grain Binding
| Cut width of binding | Fabric needed to make binding lengths of: | ||||
| 0 to 150" | 150 to 200" | 200 - 350" | 350 - 450" | 450-500" | |
| 1" | 1/4 | 1/4 | 1/3 | 3/8 | 1/2 |
| 1 1/2" | 1/4 | 1/3 | 1/2 | 5/8 | 5/8 |
| 2" | 1/3 | 1/3 | 5/8 | 3/4 | 7/8 |
| 2 1/2" | 1/3 | 1/2 | 3/4 | 1 | 1 |
| 3" | 3/8 | 1/2 | 7/8 | 1 1/8 | 1 1/4 |
| 3 1/2" | 1/2 | 5/8 | 1 | 1 1/4 | 1 1/3 |
| 4" | 1/2 | 5/8 | 1 1/8 | 1 1/2 | 1 1/2 |
| 4 1/2" | 5/8 | 2/3 | 1 1/4 | 1 5/8 | 1 3/4 |
| 5" | 5/8 | 3/4 | 1 1/3 | 1 3/4 | 1 7/8 |
Cut width: How wide you are cutting the binding strips. If you cut strips wider than 2.5", you may need a little more fabric.
How to calculate the amount of binding needed: The circumference or perimeter of quilt is the measurement of all four sides of the quilt. That means Length +length + width +width plus 10 (or more) inches to accomodate the mitered joining of the strips. For example, a quilt measuring 60" x 70" would be 60 +60 + 70 +70 + 10 = 270 inches.
Caveat: A 60" x 70" quilt would need 60+60+70+70 inches PLUS seam allowances. If you are using the suggested method of joining binding peices on the bias, you would need and extra strip or two. What???
See that fourth image at the top of the page? Whatever width of fabric you use for you binding, is going to be multiplied by two every time you make a 'join'. So, if making a 2" wide binding, you are going to use an extra 2" of fabric every time you make the 'join'.
Many times you can make the 'straight' binding from the backing fabric.
Bias binding will take a bit more fabric.
Back to Quilting Tips and Tricks Updated May 2022